
How Do Logo Digitizing Services Work? A Step-by-Step Look
How do logo digitizing services work? See the steps from artwork review to the stitch file, plus what to send and which file formats your machine can read.

A logo does not go straight from your screen to the embroidery machine. It needs a stitch file first, and building that file takes a series of decisions. Our Logo Embroidery Digitizing Services USA handle those decisions for you, from the first review to the final file.
Here is how logo digitizing services work, step by step, and what you can do to make the result better.
What Are Logo Digitizing Services?
Logo digitizing services convert a logo into an embroidery file that a machine can read. The file tells the machine where each stitch goes, which direction it runs, how dense it is, and when to change thread colors.
A JPG or PNG cannot do this, because those formats only store pixels. A digitized file stores stitch instructions. Think of it as a set of directions for the machine, written for your specific logo, garment, and size.
The Short Answer: Six Steps From Artwork to Stitch File
Digitizing follows a logical sequence:
-
Review the artwork
-
Confirm size, fabric, and placement
-
Choose stitch types for each shape
-
Set density, underlay, and pull compensation
-
Plan the stitching order
-
Export the file in your machine's format
The sections below explain each step.
Step 1: The Artwork Gets Reviewed
Everything starts with your artwork. The digitizer checks whether shapes are clear and whether the design suits thread. A vector file such as AI, EPS, SVG, or PDF is the best starting point. A high-resolution PNG or JPG can also work.
During the review, the digitizer looks for:
-
Thin lines: Hairline strokes can disappear in thread.
-
Small text: Tiny letters can fill in and blur.
-
Gradients: Thread colors are solid, so shading needs simplifying.
-
Too many colors: Extra colors add color changes and time.
If your artwork needs cleanup, our vector art service and our convert image to embroidery file service can prepare it first.
Step 2: Size, Fabric, and Placement Are Confirmed
These three details shape every later decision.
-
Size: Thread has thickness, so size decides how much detail the logo can hold. Always give the finished width and height in inches.
-
Fabric: A structured twill holds stitches well. A stretchy knit or fleece shifts more and needs stronger stabilization.
-
Placement: A chest, a cap front, and a sleeve behave differently. Our left chest logo digitizing, cap logo digitizing, hat digitizing, jacket back digitizing, and back and sleeve digitizing services cover these placements.
Step 3: Each Shape Gets a Stitch Type
The digitizer assigns a stitch type to every part of the logo:
-
Satin stitch: Smooth columns that suit borders and lettering
-
Fill stitch: Rows of stitches that cover larger solid areas
-
Run stitch: Single lines that handle fine outlines and small details
Choosing the wrong type causes uneven coverage, so this step affects how the logo looks.
Step 4: Density, Underlay, and Pull Compensation Are Set
These settings control how well the logo holds up on fabric.
-
Stitch density: Too many stitches make the logo stiff and heavy. Too few leave gaps where the fabric shows.
-
Underlay: Foundation stitches stabilize the fabric and give the top stitches a smooth base.
-
Pull compensation: Thread pulls fabric inward as it sews, so shapes are adjusted slightly to offset that pull.
Step 5: The Stitching Order Is Planned
The machine sews one element after another. A good order keeps parts aligned and limits trims and color changes. A poor order can cause gaps, extra jumps between shapes, and wasted time.
Step 6: The File Is Exported in Your Machine's Format
Embroidery machine brands read different formats. Common choices include:
-
DST: Widely used on commercial machines
-
PES: Common with Brother and Babylock machines
-
EXP: Used with Melco machines
-
JEF: Used with Janome machines
Tell us your machine's format before we begin, so the file loads without conversion problems.
The Last Check: A Test Sew-Out
A screen cannot show how thread behaves on fabric. A test sew-out on the real garment reveals problems with density, puckering, small text, and thread trims before a full run. If something looks off, a small adjustment to the file costs far less than a stack of ruined garments.
How We Handle These Steps for You
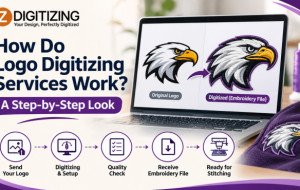
At ZDigitizing, we follow a clear process for every logo file:
-
You send your artwork. Include the logo, garment type, placement, and finished size.
-
We review the design. We check for thin lines, gradients, small text, and details that may not stitch well.
-
We digitize the logo. We set stitch types, direction, density, underlay, and order for your size and fabric.
-
You receive the embroidery file. We deliver it in a format your machine can read.
Our Logo Embroidery Digitizing Services USA follow these steps so each file fits the garment, not just the image.
What Should You Send With Your Order?
Better input leads to a better file. When you contact us, include:
-
The best version of your logo, such as a vector file, a clear PNG, or a high-resolution JPG
-
The finished width and height you want, in inches
-
The garment and fabric type, such as a polo, a twill cap, or a jacket
-
The placement, such as left chest, cap front, or sleeve
-
Thread colors or Pantone references, if you have them
-
Your machine's file format
When Do Logo Digitizing Services Pay Off?
Logo digitizing services pay off whenever a logo must look consistent across many garments. A well-built file reduces thread breaks, puckering, and re-stitching. Auto-digitizing software can produce a quick file, but it often misses the underlay, pull compensation, and stitch order that clean results need, so a manual review still matters.
This service helps businesses ordering uniforms, sports teams, schools, clubs, embroidery shops, and brands launching custom apparel.
Ready to Turn Your Logo Into Thread?
Now you know what happens between your artwork and the machine. At ZDigitizing, we build each file around your logo, size, fabric, and placement. Our logo digitizing services focus on stable stitching, readable detail, and files your machine can load without trouble.
If your artwork is ready, send it to us with the garment type, size, and placement, and we will help you decide what to adjust before the logo reaches the machine. You can also explore our patch digitizing, applique digitizing, and 3D puff embroidery digitizing services for other looks.
FAQs
How do logo digitizing services work?
Logo digitizing services review your artwork, confirm size, fabric, and placement, assign stitch types, set density, underlay, and order, and export an embroidery file in the format your machine reads. We follow these steps so the file fits your garment.
What file do I need to start logo digitizing?
Send the clearest version you have, ideally a vector file such as AI, EPS, SVG, or PDF. A high-resolution PNG or JPG can also work. Include the garment type, placement, size, and thread colors.
Why can't I embroider a JPG or PNG directly?
A JPG or PNG stores pixels, not stitch instructions. An embroidery machine needs a file that tells it where each stitch goes, how dense it is, and when to change colors. Digitizing creates that file from your artwork.
Which embroidery file format do I need?
You need the format your machine reads. DST, PES, EXP, and JEF are common choices. If you are unsure, check your machine's manual or contact us. Our Logo Embroidery Digitizing Services USA can confirm the correct format before we digitize your logo.
Can any logo be digitized for embroidery?
Most logos can be digitized, but not every detail stitches well. Fine lines, tiny text, and gradients may need simplifying. We review your artwork and suggest changes that keep the logo recognizable in thread.








Comments
0 comment